
Hey everybody. Before we jump into the article, I invite you all to check out my NFT project, VEEFRIENDS, which launched on Tuesday May 11th! My article, How to Buy Your First VeeFriends, will walk you through the concept behind the project as well as how to make a purchase. I also encourage you to join the Discord community – just a fun place to connect, hang out and ask your questions on all things VeeFriends. Hope to meet you there!
Hey everyone! Team GaryVee, back again with a follow-up to our last article, How to Make a Cryptocurrency or NFT Wallet. By now, you understand the massive revolution that is NFTs. You also know that Gary is launching his own NFT project on 5/5, and that this project is truly the culmination of 15 years of work Gary has spent building and pouring into his community since his Wine Library TV days.
Gary is extremely proud and excited to launch his collection and we’re all very excited to see the ways in which this project and community continue to grow and develop… but first, let’s make sure you’re all set up with some ETH in your crypto wallet!
If you haven’t read our last blog, you’ll want to check that out first before proceeding here. If you’re all caught up, great! That means you’ll have already set up your MetaMask wallet on desktop extension, mobile or both.
With 5/5 quickly approaching, this article will guide you on how to actually get Ether into that wallet, step-by-step, to make sure you’re ready to be part of Gary’s project!
WHAT IS ETHER?
First, what is Ether? Ether is the native currency of the Ethereum blockchain. For a deeper understanding of Ether, how it works and its unique value, check out this resource from the Ethereum Foundation. For now, just understand that Ether is the second-largest cryptocurrency in the world by market value after bitcoin. Also known by its ticker symbol — ETH — it is highly valued by Gary and other crypto investors like Mark Cuban. Since Ethereum is the blockchain foundation for the booming NFT market, anyone looking to play or invest in that world will need to have some ETH.
While you can buy this crypto directly using a wallet, there are often geographical restrictions. For this reason, we recommend buying ETH through an exchange like Coinbase and then transferring your holdings into your MetaMask wallet.
STEP 1: CREATING A COINBASE ACCOUNT
Coinbase is one of the biggest and most trusted centralized exchanges and a very user-friendly platform for beginners. Its recent public listing marked a significant shift, bringing the world of cryptocurrency much more mainstream. Accessible online or via an app downloadable to your smartphone, Coinbase allows users to buy and sell cryptocurrencies, convert or exchange one coin or token for another, and then store or send and receive that crypto with others. It also keeps users up to date with the latest crypto news and developments in pricing.
Something to note about Coinbase is that because it is a centralized exchange, users are required to provide official identification in compliance with government regulations. This means that you must be 18 years or older to use Coinbase, and you must provide certain sensitive information including photo ID and the last four digits of your social security number. Unlike many wallets, Coinbase conveniently allows for the purchase of crypto with fiat money, aka USD. Users can choose between a credit/debit card (Visa or Mastercard) or a bank account. Note that card purchases typically come with lower purchase limits and higher buy fees (this is not exclusive to Coinbase. Higher fees for credit card purchases are typical for many crypto services).
That being said, please, PLEASE, note that your buys on Coinbase can take quite a while. Coinbase uses an ACH bank transfer system for payments made with your bank account, meaning that once you initiate a crypto purchase, it may take **minimally 5 days to be completed and for your holdings to be available to send from your coinbase account to a self custody wallet like MetaMask. As noted in our last article, you can avoid these delays by wiring money from your bank into your Coinbase wallet. Either way, be sure to get set up as soon as possible.
You may use Coinbase on your computer, but it is commonly used as an app for both iPhone and Android. For a play-by-play on how to set up your Coinbase account in-app, follow the steps in this guide.
STEP 2: BUYING ETHER
Remember, while you may be excited to get started, always use good judgement. Rule number one of investing in anything — including crypto — is to never invest more than you can afford to lose. It’s important to understand that all crypto assets correspond to different trading prices, which are subject to change frequently. In other words, the price of ETH may rise or fall depending on the day or even the time of day that you make a purchase.

For Gary’s upcoming project launching on 5/5/21, we recommend having at least 1 ETH in your wallet to cover purchases and gas fees, or the additional costs of performing transactions on the Ethereum network. That being said, Gary and the team understand that cost is a valid concern, and we encourage you to be smart and do what is right for your own situation.
Now, you’ve downloaded the Coinbase app and you’re all set up and ready to buy:
- Open your Coinbase app.
- From the homescreen, click the blue button with arrows at the bottom of the screen. Then, select “Buy” from the dropdown menu. This will open up a list of different crypto assets offered by Coinbase for buying and selling. (Alternatively, you can navigate to the “Prices” tab from the homescreen, click the crypto asset of your choice, and click “Trade.”)
- Click on the option for Ethereum (ETH) — be sure to note the current trading price listed on the right hand side.
- On the next screen, decide how much ETH you want to buy and enter in the amount. You can also denominate your purchase in ETH. After deciding on your desired amount, click the blue “Preview buy” button.
- On the “Order Preview” screen, review all of the information. You’ll see the amount of ETH you’re preparing to purchase as well as the price. Note that the trading price can go up or down before you’ve finalized your purchase. You’ll also see your preferred payment method, the fee that Coinbase takes for the transaction and finally, the total amount you will be charged.
- If all of this information looks good to you, click the blue “Buy now” button to purchase your ETH. You will be brought to a confirmation page and an additional confirmation will be sent to your email address.
STEP 3: SENDING ETHER TO YOUR METAMASK WALLET
Congratulations, you now own ETH! 🎉 Now, let’s send it over to your MetaMask wallet.
- In your MetaMask app, find your public address. This is a long number starting with 0x listed underneath your account name. Tap on this number to copy it to your clipboard.
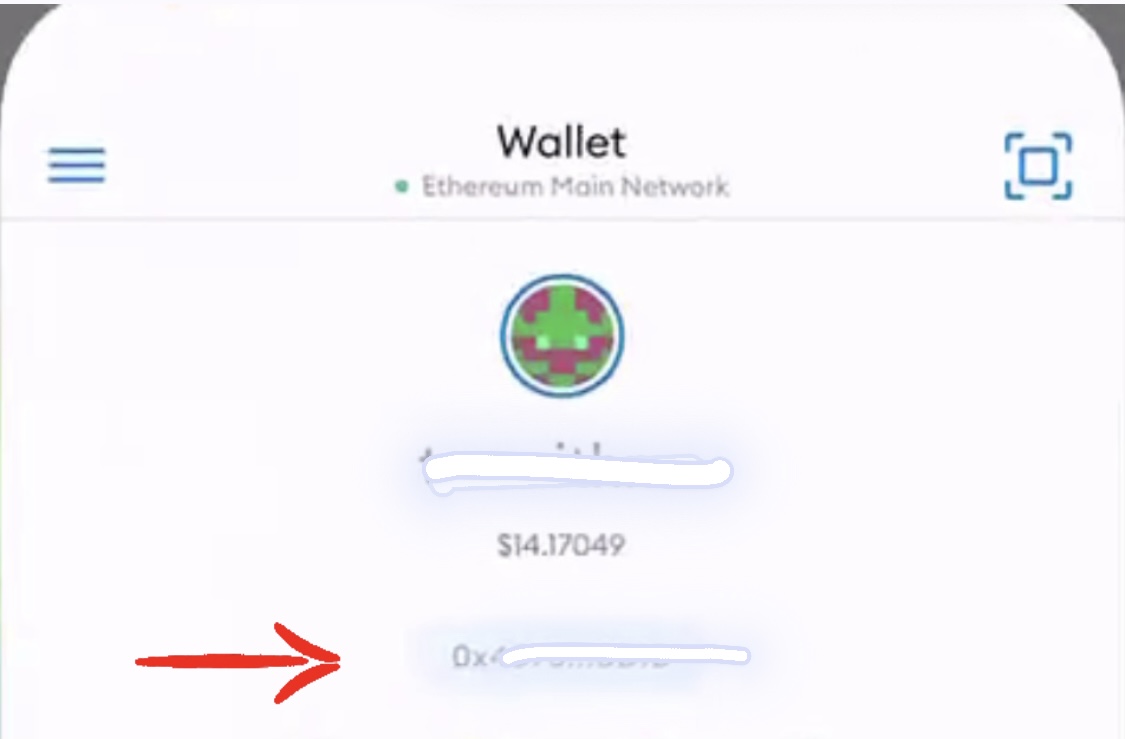
- Once you’ve copied your address from MetaMask, go back into your Coinbase app and navigate to the “Portfolio” tab on the bottom of your screen. From there, click on “Ethereum” and click on your “ETH Wallet.”

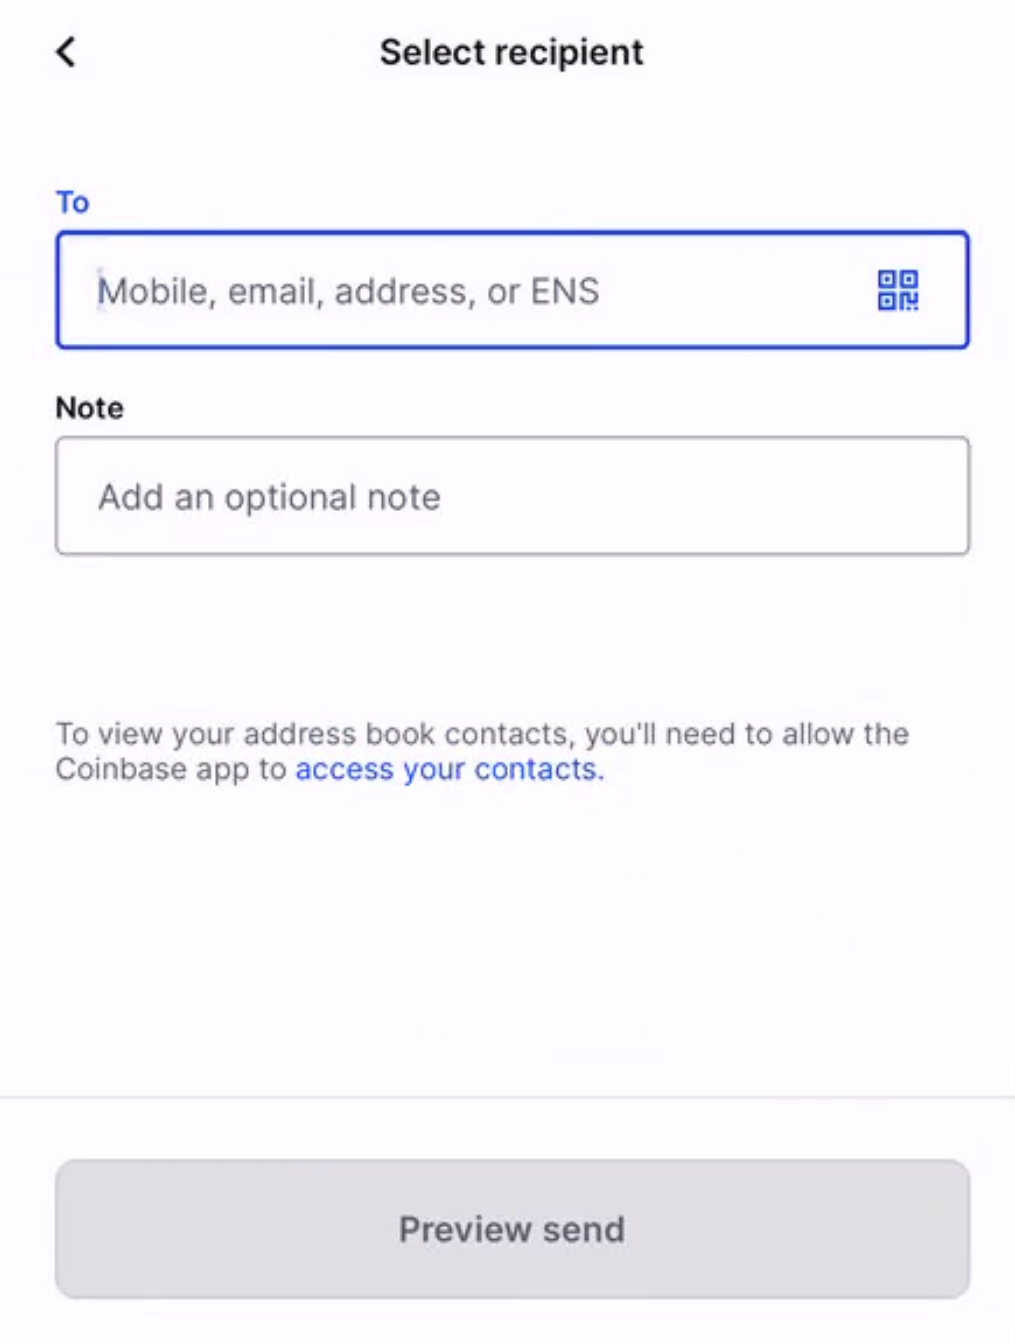
- Then, click on the send icon on the right hand side of the screen.

- Now, decide how much ETH you would like to send to your MetaMask address. You can choose a portion or send the max amount available. *We recommend sending a very small amount as a test transaction to ensure that the funds are received in your MetaMask. Sending a small test transaction out before adding large amounts of funds to ensure you have successfully created a wallet you can operate is a good idea. Also, please note that before sending any value to a wallet, it’s recommended to test your seed recovery phrase and ensure you have the same address after recovery before adding any value to a wallet from an exchange like Coinbase.

- Finally, in the “To” bar, paste the address you copied from MetaMask, add a note (optional) and hit “Preview send.”
- Once you finalize, you will have successfully sent your ETH from Coinbase into your MetaMask wallet!
STEP 4: LINKING YOUR HARDWARE WALLET
As a final, optional step, you may decide to link a hardware wallet to your MetaMask for additional cold storage security. Remember, cold storage wallets store your private keys independently of an internet connection on a USB or thumb drive-like device. Two of the most reputable and commonly-used hardware wallets are Ledger and Trezor. While MetaMask and other web wallets are great for storing smaller amounts of crypto, you may want to invest and pair your MetaMask with a hardware wallet for larger sums.
Luckily, MetaMask makes this very easy with a “Connect Hardware Wallet” functionality built into the desktop extension. For more information on this process, check out this MetaMask Support guide. Please note that the wallet address of a hardware wallet is different from the one created during the setup for MetaMask, so be sure you are using the correct address. MetaMask doesn’t let you remove the one you create when you first setup the MetaMask extension, and the hardware wallet must just be added as an additional.
There you have it! You’ve now gone through the necessary steps to purchase Ether on Coinbase and transfer it safely to your MetaMask wallet. Again, remember the rules of crypto — always be smart with your investments and safe with your private keys. We’ll see you on 5/5!
Thank you for reading. If you found this article helpful, please consider sharing it with a friend interested in crypto, NFTs in general or Gary’s upcoming project.

Can’t wait to share this with others who’ll find it useful.
555
555
555
555
555
555
6xAO2nLh
0’XOR(if(now()=sysdate(),sleep(15),0))XOR’Z
-1); waitfor delay ‘0:0:15’ —
JomJTSKh’; waitfor delay ‘0:0:15’ —
-1)) OR 726=(SELECT 726 FROM PG_SLEEP(15))–
JDg82AnP’) OR 937=(SELECT 937 FROM PG_SLEEP(15))–
555’||DBMS_PIPE.RECEIVE_MESSAGE(CHR(98)||CHR(98)||CHR(98),15)||’
I always learn something new from you.
Your blog always gives me something valuable to take away.
Thanks for shedding light on this subject.
Your blog has become one of my go-to resources.